About Me Tab tutorials Tab projects tab recipes parties buttons advertise feater
Welcome to my blog! If you are new here you may want to check out my projects, tutorials and follow along! Have a great day!

Wednesday, November 30, 2011

We have a WINNER!! And I have a new haircut

So I got my hair cut tonight- I absolutely love it!! I was looking through my computer files to find a before picture and the only picture I have of me with my hair down was clear back in JULY- if that wasn't a sign I need to get my hair cut I don't know what is!


AFTER- With my Penny Dog!


AFTER- side view


BEFORE with LONG HAIR (self portrait from the photography challenge!!)

It is so much shorter and feels very light and fun- I am hoping I will be able to style it good though- always makes me a bit nervous!


So what do you think? Good change- or I chopped off all my pretty hair? :)


It is also time to announce the winner of the Thanksgiving Giveaway- 

And the Winner is:

Comment Number 12-

AussieStar- You are so generous to give away some things just in time for Chrissy. :) Being from the southern hemisphere, we don't have the snowy Xmas. Instead we usually have a very hot one. Have a wonderful time with yours over Xmas. :)
Aussie Star


I will be in contact with you to have you pick your prize!


Signature 2

Tuesday, November 22, 2011

Thanksgiving Giveaway- Cross Stitch and Embroidery Fabric- Plus Pattern!!!

Sorry things have been slow around the blog lately- all of the projects I have been working on have been SECRETS!!!

To break the boredom I though I would have a giveaway for my stitchy friends!! I know not all of my readers cross stitch and embroider- but this giveaway is for those that do!

I am giving away 2 items from my Etsy Store (or another piece of linen or aida- you can request colors and counts- I will do my best to find what you want from my inventory- Largest Size available is 18"X27")

AND

Your choice of ONE of the following NEW cross stitch patterns/kits.


Mirabilia- Giggles In The Snow (pattern only)


Mirabilia- The Forest Goddess (pattern only)


Mirabilia- Ring Around The Rose Tree (pattern only)


Newton's Law- Thinking of You (kit)


To Enter-
All you have to do is leave a comment
For Additional Entries-
Follow my Blog and leave me a comment saying you do so
Share this giveaway on your blog, facebook or Twitter and leave a comment telling me where you shared it.

Giveaway Closes November 30th at 8:00 p.m.
Winner Will be Announced December 1st

Good Luck!! And I am really thankful for my readers!!


Signature 2

Thursday, November 17, 2011

Photography Challenge Week #16- Someone You Love

I have been slacking on my photo challenge posts- last week was something that I made .


So here is a picture of some homemade cupcakes I made- mmmm.


This week's challenge is someone that you love. I love all of my nieces and nephews but this is a fun picture that I got of my little niece Marley! She is such a joy in my life!

Linking Up with A Step in The Journey for the 20 Week Photography Challenge.

Thanks for stopping by!
Signature 2

Wednesday, November 16, 2011

Happy Birthday Little Sis!!

Today I want to wish a very very Happy Birthday to my sweet, funny, fun and beautiful little sister Ellen!!


I miss you so much since you moved to Colorado but I am excited to see you over the holidays!!

Thanks for stopping by!
Signature 2

Tuesday, November 15, 2011

Tuesday 10- 10 Amazing Thanksgiving Recipes

Do you know what you are taking to Thanksgiving Dinner this year?? Luckily I don't have to host so I only have to pick out 2-3 recipes to take, but I will let you in on a secret- I haven't decided yet!!

This year all of my usual planning ahead traits seem to have taken a nap, so I am flying by the seat of my pants! I am sure I will decide soon!

In the meantime, here are 10 great recipes I have gathered from blogland to help speed my decision along! Hope you find them useful!!

Appetizers


1. Healthy Buffalo Chicken Rolls at Can You Stay for Dinner?
These look amazing- may want to try them just at home first :)


2. Turkey Cheese Ball at Gluesticks
How cute and clever is this, plus yummy!

Main Course

3. Roasted Green Beans With Shallots and Garlic at A Little Bit Crunchy a Little Bit Rock and Roll
A mix up from the usual green beans.


4.Tomato Basil Soup For a Crowd at Tales of A Trophy Wife 
I LOVE tomato basil soup- this sounds so good!


5.Butternut Squash Casserole at Let's Try These
This looks like a great way to incorporate harvest vegetables into dinner, yumm!

6.Asiago Garlic Rolls at Frugal Antics of a Harried Homemaker
MMMM Garlic Cheese Bread- enough said.

Desserts

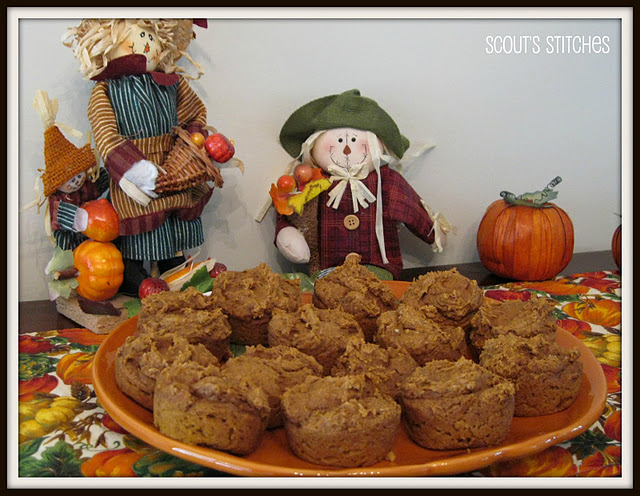
7. Two Ingredient Pumpkin Spice Muffins at Scout's Stitches
These are great if you have to prepare something in a hurry, mix it together and you have some yummy muffins!

8. Owl Cupcakes at Simple Girl
Owls are so cute!! Love their little beaks


9. Peanut Butter and Chocolate Caramel Corn at A Pumpkin and A Princess
Wow, this looks simply amazing and a great treat to SHARE at a family get together!

10. Whole Wheat Pie Crust at Feeding Nine on a dime


I have been looking for a simple Whole Wheat Pie Crust forever!
I will be linking up with Under The Table and Dreaming.
Thanks for stopping by!!

Signature 2

Friday, November 11, 2011

From Zoe's Kitchen- Oatmeal Scotchies

No New Food Friday this week! I have been so tired I haven't even cooked this week, unless you count Brussel sprouts!

Here is a recipe my sister gave to me a long time ago. These are my husbands absolute favorite cookies. I bought the butterscotch chips a while ago to  make these for his birthday and I forgot, so he got them last week.  Hope you enjoy the recipe as much as we do!


ZOE'S KITCHEN BUTTON


Oatmeal Scotchies
1 cup softened margarine
1 cup brown sugar
1/2 cup sugar
2 eggs
1 tsp vanilla
2 1/4 cup flour
1 tsp baking soda
1 tsp cinnamon
1/2 tsp salt
3 cups oats
1 bag butterscotch chips

Preheat oven to 350 degrees

Beat together the margarine, sugars, eggs, and vanilla

In separate bowl mix flour, soda, cinnamon and salt.


Mix dry ingredients into creamed mixture. Stir in oats and fold in butterscotch chips.

Bake for about 9 minutes.


Enjoy!!!

I will be linking up with some of These Parties!!

Thanks for stopping by!
Signature 2

Wednesday, November 9, 2011

I was featured!!

Thanks to these awesome blogs for featuring my Rapunzel Costume this week! 
I really really appreciate it!!


Have a good night!

Signature 2

Tuesday, November 8, 2011

Interchangable Welcome Sign


As you know, I like to handmake most of the gifts that I give. I got the idea for my sister's birthday gift from Lolly Jane's Interchangeable Bunting Board. I wanted to make mine a little different- wrap the hangers around from the back instead of using the mini-clips like they did. I like the way mine turned out. 


Materials:
12" X 12" board- luckily I had some leftover from this project (Hmmm, maybe I should make one of those for our house!)
Paint
Printer
Pencil
Nails
Scrapbook Paper, Felt Cut-Outs
Ribbon

I sanded down the board, painted it cream and then watered down some brown paint to give it a light brown wash.

For the lettering I don't have a fancy Silhoute or Cricut or anything so I used old fashioned tracing.
I printed "Welcome" out in a size and font I liked and traced it onto the board.
I painted it with two coats of brown paint.

For the bunting I nailed 4 nails in the back of the board and measured out ribbon to fit onto the nails.

The Christmas bunting is made out of Ric-Rac and felt cut-outs I bought from Hobby Lobby.
The Halloween bunting is made from Ribbon and Scrapbook Paper embellished with Glittery Bat stickers.

I have made a few more buntings to send to my sister, but I will let her see them before I post them on here.

I love this project because it can be displayed all year round either on a frame stand or with a sawtooth hanger!

I hope you enjoy it Camille!!


Linking up with some of These Parties!!


Thanks for stopping by!!
Zoe

Friday, November 4, 2011

Gust Post on Toddler Nutrition- Check it out!!

Just writing a quick post to wish everyone a happy weekend and let you know I am posting over at Through the Eyes of the Mrs. today. I am talking about Toddler Nutrition Tips, so if you have a toddler it would be a great thing to check out!

I have a few more projects ready to post on, just haven't found the time to sit down and write them! Hopefully this weekend! Have a great day!

Signature 2

Tuesday, November 1, 2011

Patchwork Christmas Ornaments

I posted this back in September for Stashbusting September at the T-Shirt Diaries. I figured since it is November it is fair game to start posting Christmas projects!

Every year I love to make handmade ornaments for my family and friends. Usually I plan what I am going to make, go out and buy supplies, then get to crafting. Not this year- I am going to use only what I have on hand! And I have LOTS of fabrics on hand. So here you are- some easy Patchwork Christmas Ornaments.


First off, don't limit yourself to Christmas ornaments on this project. You could make them into any seasonal ornaments you want or even into coasters. Make them a little bigger and they can be place mats! I thought doing them in fall colors and a pumpkin cutout I could make some really pretty coasters!

First off I found all my red and green fabric from my stash and started cutting. I cut my patchwork pieces into 3/4" squares in order to make a finished ornament of 3" X 3". Then lay them out in a pattern you like. I chose to off-set my columns so I didn't have to worry about lining up all those tiny corners.


If you have never done patchwork, don't be afraid- it really is just sewing in straight lines. And if it isn't totally even, that's OK- it looks more homemade that way!

First step- take two squares- hold them right side together- sew with a 1/4" seam allowance.


Then take the next piece, hold it right side together with the piece you want it to border and sew.


Once you get your first column done, press all seams to the side. I like to use spray starch to help get it flat.

Sew all of your columns. Place them right side together next to each other, line up the seams with the center of the adjacent columns squares. Sew with 1/4" seam allowance.


Once all of your columns are pieced, spray with starch and press seams flat. Trim around edges to make a square.


For the overlay I used t-shirt fabric so that it wouldn't fray. I cut out the square and centered a stencil of the shape that I wanted over it. I used hearts and stars. Trace the shape and cut out the inside portion so that you have a square with a heart cutout in the middle of it.


Use spray adhesive to hold the overlay in place on your patchwork piece. Stitch in contrasting color around edge of cutout.


Cut matching size square for backing on the ornament. I like to add a little bit of personalization so I embroidered "Love, Zoe" on the backs. Cut ribbon or cording for your hanger- pin in between the backing and your front piece. Sew around edge of the whole ornament. Use pinking shears to trim the edges.


Give as gifts or keep some for yourself. If you don't want to do the patchwork part, doing a solid or pattern as the background works well too. Or you can pieces strips or diagonals, however you want to do it! Have fun with it!


Thanks for stopping by, I hope you can find some cute things to make out of this tutorial!

Linking with these great parties!

Signature 2
Related Posts Plugin for WordPress, Blogger...