About Me Tab tutorials Tab projects tab recipes parties buttons advertise feater
Welcome to my blog! If you are new here you may want to check out my projects, tutorials and follow along! Have a great day!

Monday, November 14, 2016

Making a Barn Quilt

One of my great friends who blogs over at Home on the Range Exchange was hosting a Barn Quilt class. I thought it sounded like a fun idea to get out of the house and be creative. Plus I haven't had a lot of time to quilt lately so I was happy to have a quicker finishing project.  This is my completed square. I love the way it turned out and it sets on my front porch now. 


The history of barn quilts is actually really interesting and someday I would like to go see the Flint Hills Barn Quilt trail.

Friday, October 30, 2015

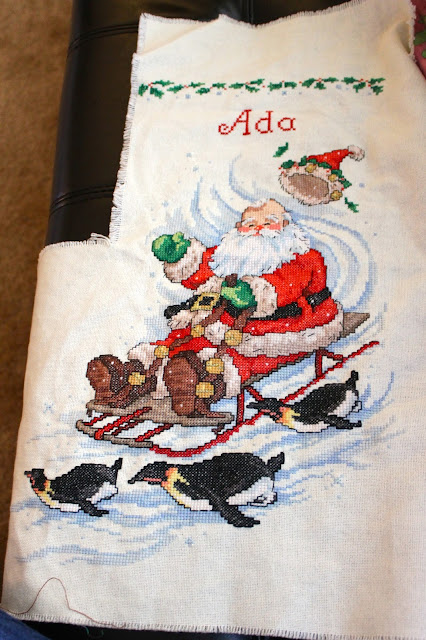
A Christmas Stocking for Ada


It has been so long since I completed a cross stitch project and it feels so good to have this one done. I think the last project I completed was the twin's Care Bear quilts.  I bought this pattern back when I worked at Hobby Lobby and it went on after Christmas clearance.  It sat unused in my stitching stash until about a week before the twins came I decided to get it started. I had been off work for a couple weeks and was so sick of just watching T.V. but I couldn't really move around a lot.  

I love this pattern and I really hope that Ada will love it as she grows up.  I did goof up a bit and didn't baste the edge of the fabric. It unraveled and made the pattern not fit all the way on the left top. But I will just adjust when I am sewing it together.  This will probably go into storage until I finish Ty's stocking and then I will sew the up at the same time.

I love that their stockings will match Bret and mine and I am excited to see them all finished. While I was typing this up I realized I have never shared our Christmas stockings. I will have to do that soon! Christmas is such a special time and having homemade decorations just adds to it for me.

Thanks so much for reading,
Zoe

Thursday, August 6, 2015

Quick and Easy Block Quilt

I made this quick and easy block quilt when my twins were 3 months old. Looking back I don't know how I found the time, but I had promised myself I would make a quilt for all my nieces and nephews on their 10th birthdays and my nephew Trey was turning 10.  

Here is the quilt I made for his brother on his 10th birthday.  


The pattern I used I based off of a pattern I pinned. I added his name in contrasting colors.  
The pieces I cut were as followed:

6" Squares-
Red- 24 squares
Blue- 12 squares
Yellow- 24 squares

12" Squares-
Jayhawk Fabric- 12 squares

The thing I liked about making this quilt was that it really was easy because there were only 2 sizes of blocks to cut and the larger pieced blocks were all the same, I just sewed them together different directions when I pieced the whole quilt.

I feel like this would be an easy pattern to use if you find a fabric that you absolutely love the print of it and you can make it the bulk of the quilt by using it as the larger block.


I am hoping to start on some more quilts soon- maybe a quilted tree skirt too!

I will be linking up to Parties!

Thanks for reading,
Zoe

Thursday, July 30, 2015

Fresh Quinoa Salad

I love this salad so much. It is delicious, nutritious and refreshing. I have made several variations of this over the years but today I am going to share my favorite variation. Even my husband (who is not a fan of quinoa) will eat this one. I am still working on the kids eating all of it- they will currently pick out the corn and the beans.... which is good I guess for 17 month olds!

Now that I have been trying to cook more from scratch this is going to be added to my monthly menus!!


Quinoa Salad

3 Cups cooked quinoa
1 diced red onion
1 can black beans (drained and rinsed)
1 can sweet corn (drained)
1/4 cup diced fresh cilantro
1/4 cup olive oil
2 Tbsp Red Wine Vinegar
1 tsp salt
1 drop lemon essential oil or 1 tsp lemon juice (If using oil make sure it is of food grade quality)
1 drop lime essential oil or 1 tsp lime juice (If using oil make sure it is of food grade quality)

Mix all ingredients together and let set for at least 4 hours (overnight is better) to get the flavors mixed in.

I hope you enjoy this salad as much as I do. It is perfect for taking to potlucks as well as for a side dish with a summery dinner!

Thanks for reading,
Zoe


Thursday, January 29, 2015

A Vintage Spring Table Runner

A Vintage Spring Table Runner
 I am so excited to share a project with you today!!


This spring I decided to make a table runner. I wanted it to be bright and cheery so that it would make me happy every time I saw it. I had a bunch of vintage floral fabrics that belonged to my grandmother. I mixed in one fabric that I had purchased at Wal-Mart. 
Do you want to make your own spring table runner? Here is how I did it!

You will need:
5-6 different coordinating floral fabrics, a fat quarter is plenty of each
(I chose mainly greens and blues with a pop of pink) 
Rotary Cutter
Basting Spray
Batting (at least 13 1/2" X 40 1/2")
Fabric for backing (I made mine 13 1/2" X 40 1/2")
Fabric for binding or bias tape (about 3 yards length)

How To:
Cut out strips of the fabrics in a variety of 1", 2", and 3" by 13 1/2" long.

I chose to keep my accent strips (the pink) all 1" strips.


Arrange strips in an order that you like. I tried to get mine to be about 40" total, but the length can vary.

Sew each piece to the adjacent, right sides together. Press seams after sewing.

Once the top is done cut the batting and backing to be a little bit larger than the top.

Using basting spray stack the backing, the batting and the top.

Quilt along seams in contrasting thread color. 

When it comes to adding the binding I still have to check back with a tutorial I found a long time ago. It explains making bias tape and binding the quilt a lot better than I ever could!

Here is the link- How To Bind a Quilt

The video shows how to hand sew it to the back, but I usually just sew it on with coordinating thread on the machine.

And then you are done! Enjoy Your new table runner!!

 What the binding looks like on the back.

 Larger view of the back.

Thanks for stopping by!
Related Posts Plugin for WordPress, Blogger...