About Me Tab tutorials Tab projects tab recipes parties buttons advertise feater
Welcome to my blog! If you are new here you may want to check out my projects, tutorials and follow along! Have a great day!

Showing posts with label CROSS STITCH/EMBROIDERY. Show all posts

Friday, October 30, 2015

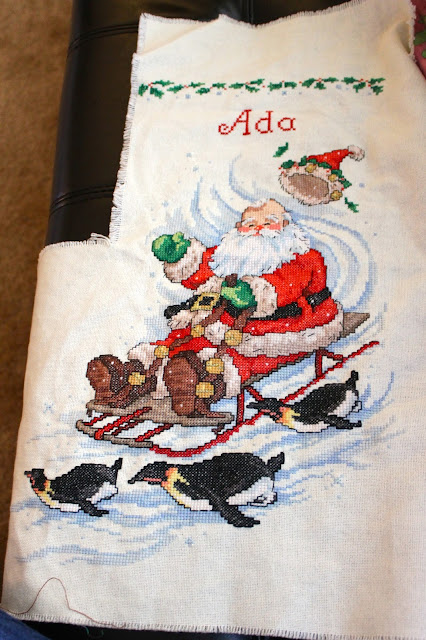
A Christmas Stocking for Ada


It has been so long since I completed a cross stitch project and it feels so good to have this one done. I think the last project I completed was the twin's Care Bear quilts.  I bought this pattern back when I worked at Hobby Lobby and it went on after Christmas clearance.  It sat unused in my stitching stash until about a week before the twins came I decided to get it started. I had been off work for a couple weeks and was so sick of just watching T.V. but I couldn't really move around a lot.  

I love this pattern and I really hope that Ada will love it as she grows up.  I did goof up a bit and didn't baste the edge of the fabric. It unraveled and made the pattern not fit all the way on the left top. But I will just adjust when I am sewing it together.  This will probably go into storage until I finish Ty's stocking and then I will sew the up at the same time.

I love that their stockings will match Bret and mine and I am excited to see them all finished. While I was typing this up I realized I have never shared our Christmas stockings. I will have to do that soon! Christmas is such a special time and having homemade decorations just adds to it for me.

Thanks so much for reading,
Zoe

Sunday, May 4, 2014

The Twins' Care Bear Nursery

For the twins nursery I wanted to do something bright and cheery that they could enjoy for a while.  I love classic care bears and decided to use those type of colors for the nursery. Also the Care Bear quilts would go good with the decor. We had already painted the room yellow when we moved into our house 3 years ago (planning that it would be a gender neutral nursery).


Their changing station- my husband's great grandfather made this changing station for him as a baby and it is still in great shape for us to use for the twins- there is storage behind the doors which works perfectly for holding cloth diaper covers, cloth wipes, receiving blankets and burp clothes!


We kept the twin bed in the bed room because I knew with twins I would be spending a lot of nights in the nursery. I sewed the curtains and matching pillow covers several years ago for a house I had in college. I made the care bear pillow to match the rest of the decor.


A book shelf for holding toys and books.


Little Man's bassinet/pack and play with his quilt hanging above it.


My sister drew this picture for the twins before they were born.


Diaper basket with all of their GMD newborn pre folds ready to go. It makes me sad that they have almost outgrown their newborn  pre folds already!


I made the cradle pad cover from leftover quilt fabric.


Care Bear lamp along with little monsters from my other sister.


I made this cross stitch as soon as I knew I was pregnant.  It was done before we even knew we were having twins and it hangs in the nursery. It is a design that came from Care Bear Baby Book.


The changing station. The babies love the little rattles while they are getting their diapers changed.  I made the changing pad cover using this tutorial from Family Julius.


For the rainbow and cloud mobiles I used a Rainbow Brite Mobile pattern that I altered to fit my needs. I used felt for the rainbow, stars and hearts. I used a cotton fabric for the clouds. I love the way it looks in the corner of the room and the twins already love staring at it as it moves.

Thanks for stopping by!
Signature 2

Thursday, May 1, 2014

Care Bear Baby Quilts for Twins


I had previously posted finished Care Bear Cross stitches on my blog. I had always wanted to make a baby quilt out of them when the time came.  I had four of them all ready to go- bedtime bear, good luck bear, cozy heart penguin and proud heart cat (yes I am a nerd who knows all the names of the Care Bears and the Care Bear Cousins!).  But then I found out we were having twins! I knew I wouldn't have time to stitch four more Care Bears, so I altered the quilt design to have an appliqué in the center square and put their name with a border on the lower right square.  Then I stitched Baby Hugs and Baby Tugs Bear which was perfect for Little Man and Little Lady's quilts!


The finished quilt for Little Lady.


I used the quilt as you go method to put these quilts together, because I don't have a quilting machine at home and I knew the shop I usually take quilts to couldn't have them done in time for the babies' arrival.  There was definitely a learning curve with getting the back to line up right, so Little Lady's quilt is definitely sewn better than Little Man's because I did it second.  It is a method I would use again, but probably only on quilts this small or smaller.


The finished quilt for Little Man.


The quilts hang in their nursery and I love how cheerful they look on the walls.  I also use them as a background for the twins monthly growth pictures. 

 Little Lady at 2 Months

Little Man at 2 Months.


Thanks so much for stopping by!

Signature 2

Monday, March 5, 2012

June Embroidery from Sarah Jane Studios


I started working on a cross stitch the other day and I found this sweet embroidery that I forgot to share.  I made this for my sister but haven't finished it off yet. I plan to put it onto a beach bag and probably give it to her this summer!


The little girl embroidery pattern is from Sarah Jane Studios. I love all of her designs and fabrics- so sweet and innocent! I like all of her months of the year series, but I thought this little one was so cute.  The Holly Hocks were a free pattern that I don't remember where it came from.


The Holly Hocks remind me of summers growing up because we always had an abundance of them and they are so pretty! Can't wait for the Holly Hocks to grow in at our new house.


This weekend was pretty good- I went for a long walk with my husband and dogs. We were trying to find deer sheds but we didn't find any. The outdoors were beautiful though and it is always nice to be able to spend quality time with my loves.


Hope you all are having a good Monday and that the week treats you well!

I will be linking up with some of these parties!

shabby creek cottage
Cheers- 
Zoe

Wednesday, January 25, 2012

Golden Retriever Emboidery- on a Zippered Bag!


There is nothing I love more than giving handmade gifts. For my sister Ellen's birthday I made her this cute embroidery of a golden retriever. She has a sweet golden retriever named Indy, so I thought she would love it! I got the pattern from penguinandfish's Etsy store. I love all of her patterns- they are adorable!


I did the embroidery on 28 Ct cream Lugana- love this fabric!! The other thing I really like about the embroidery is that I used a verigated thread for the details around the edge.

I finished the pattern off into a bag using the Zipper Bag Tutorial that I posted about a while ago.
Interestingly enough, the fabric I used was from the same type of pants I used for my nephew's bag- just a different color!


Happy Birthday Ellen! Sorry it was Late!
Here is a picture of her dog Indy when he was a puppy- I think the embroidery pattern captured him perfectly!

Linking up With some of these parties!
Thanks for stopping by!

Signature 2

Wednesday, January 11, 2012

Felt Applique Picture

I posted this on Saturday on Home Savvy A to Z but I am posting it again in case my readers missed it! I will show you how to make a felt applique picture.


For Christmas we did a gift exchange draw and I got my sister Camille. I decided to make her a appliqued picture with embroidery over it. I am not sure when I came up with the idea, but I like the way it turned out- I hope she likes it too!

Here is the tutorial on making a felt applique picture.
First find your inspiration picture (or sketch one up if you are that talented!).

You want to look for something that doesn't have too much detail or else it may get a little tricky. This picture did have a lot of detail, but I chose just to do the main shapes out of felt and add details with the embroidery floss.


I found this vintage clip art on The Graphics Fairy. I liked the layout of it but I didn't want to put the boy in it, so I just didn't cut him out.

Using a copier resize the image to how big you want your picture to be and make several copies.
Cut out each element of the picture that you want to make a different color.
I used a couple different shades of green for the grass.


Use the paper as a template for cutting out different colors of felt. I got all of my felt from the Etsy seller Giant Dwarf- it is a really nice fancy felt and there were so many colors to choose from. Regular acrylic felt may work for this, but I would be afraid it would fray too easily.

Then I traced the outline of where I wanted to put it on my embroidery fabric.

 I used 28 Ct Sky Blue Lugana. You can use regular cotton fabric to stitch this onto as well, I just liked the color of Lugana I had. I sell cross stitch/embroidery fabrics like this in my Etsy store and they are great for projects like this!

Then I used temporary spray adhesive to hold the pieces of felt together until I could embroider around them. You have to think a little bit here and layer them correctly but it isn't too difficult.

After that I used embroidery floss to stitch around the edges and add details to the picture.

I mostly used backstitches but if you are really good at embroidery and depending on the picture you are making I think specialty stitches would look pretty cool.

The only thing I wish I would have done differently was the white pieces. I couldn't get right on the edge of the felt without it fraying down and I don't like the brown outline inside of it- oh well, lesson learned!


The finished embroidery- I think my favorite part is the details of the leaves on the ground and the grass.

Now to Frame the Project:
This is the method I use for framing cross stitch and embroidery projects. I am not sure if this is the best way or the correct way but it has worked for me.

I get a 1/4" piece of foamcore in the size a little larger than the inside section of the matboard.

Center the front of the project on the foamboard and wrap the edges around tight.

Using T-pins pin the fabric into place on all four sides.

Then take thread and sew the raw edges together on the back to hold them firmly in place- I forgot to take a picture of this step.

Place foamboard centered on matboard opening, tape into place. I use masking tape and go across it both ways multiple times.

Place matboard in frame, cover back with posterboard or paper.


Here is the finished framed project- I hate taking pictures with the glass in the frame!
I like the way it turned out- hope my sister likes it!

 I will be linking up with some of these parties!
Linking up with BRAG MONDAY at The Graphics Fairy
Have a great day and thanks for stopping by!

Signature 2
Related Posts Plugin for WordPress, Blogger...